
With the rise of the Warhammer Underworlds Rivals format it’s now easier than ever to pick up and play with any warband. Rippa’s Snarlfangs first appeared on the scene back in Beastgrave, and are a popular choice for playing Rivals format.
We’re here to give you some tips on how to pounce into the major leagues with this wolf pack. So pick up your Boss Loppa and mount up as we prepare to learn how to win with Rippa’s Snarlfangs.

Strategy
How they play
Rippas Snarlfangs are a very straightforward aggro warband – They want to get stuck in and take some enemies out of action. They’re a very elite warband with 3 members, so you’ll need a little bit of planning to get the most out of your 4 activations.
What makes Rippa’s Snarlfangs unique is their use of reactions. After each activation including an attack there’s an opportunity to follow up with a Snarlfang’s Jaws attack action. While it can be a little unreliable, there’s a lot of potential damage output straight out of the gate, and allows you to take out higher-wound fighters or even attack multiple targets with ease.
Rippa’s Snarlfangs are a popular choice for Rivals format because they have a very strong set of faction cards. Their objective cards give a potential 19 glory, which is higher than most warbands. They also come with a good number of surge objectives which are all easy to score just by playing to the warband’s strengths. It’s very easy to get the ball rolling for that initial glory.
Inspire mechanic
There are two inspire mechanics. Stabbit & Mean-eye inspire when Rippa is targeted with an attack. Rippa however inspires when he has 3 upgrades. Already we can start to see that the game-plan is going to revolve around buffing Rippa and being aggressive with him. At the same time you want to avoid being reckless and putting him into too much danger without support early on.
Fighters
All 3 of the fighters start with 1 block, which increases to 2 dodge when inspired, so inspiration is key to survivability. They also increase in speed from 4 to 5, which helps to chase down opponents later in game.
Mean-eye is the only fighter to start the game with a range 3 attack, which can be useful for your action economy, and often comes in handy for baiting your opponent to come to you early on in the game, setting you up for a counter charge. When inspired, Mean-eye’s attacks become more reliable.
Stabbit has range 2 attack, which is useful for attacking nearby targets, and knockback 1 which is ideal for controlling enemy fighters. Obviously attacking from a distance or pushing your opponent back stops you being able to make a Snarlfang’s Jaws reaction, but it does give you more flexibility.
When inspired, Stabbit gains a new attack which comes with scything, which means you can charge stabbit into groups of multiple enemies and deal out damage in all directions.
Rippa Narkbad is the leader, and starts out with a better potential damage output than the other fighters, dishing out up to 4 damage per turn between his two attacks. Rippa gains a new range 3 attack when inspired. While it might not be as great in terms of damage output, it’s ideal for optimising your late-game action economy.
Key Cards and How to Use Them

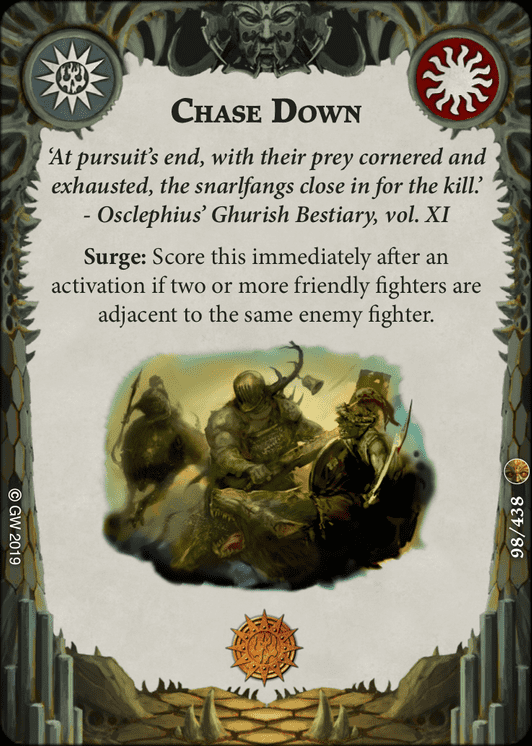
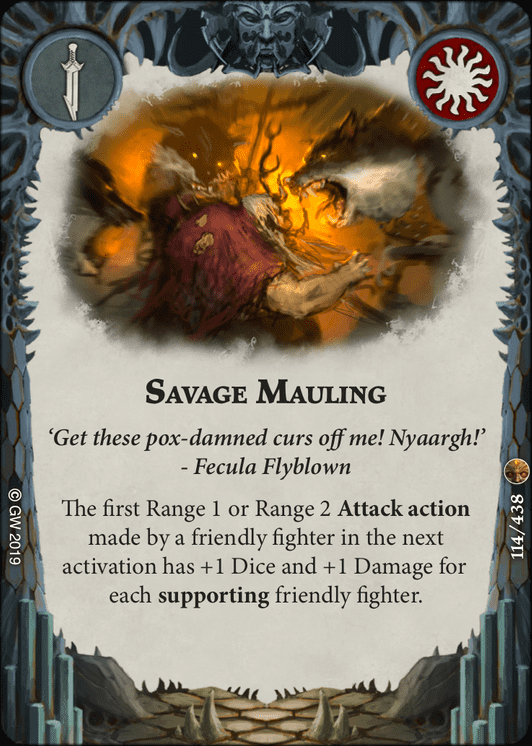
Chase down, Pack Tactics and Savage Mauling
One of the main things you’re going to want to do with this warband is get in close and gang up on enemies. As well as the support you’ll get in your attack and defence rolls, there are a number of cards that work well with it. Chase Down is an ideal objective to have in your starting hand, as it’s going to be really easy to score early on.
Against horde warbands this can be a little harder, because you risk killing the fighter before you can score it. Thankfully Pack Tactics gives you an ideal way to push your fighters forward. If your models are next to each other, then this means you can push your entire warband forward to pin down an enemy.
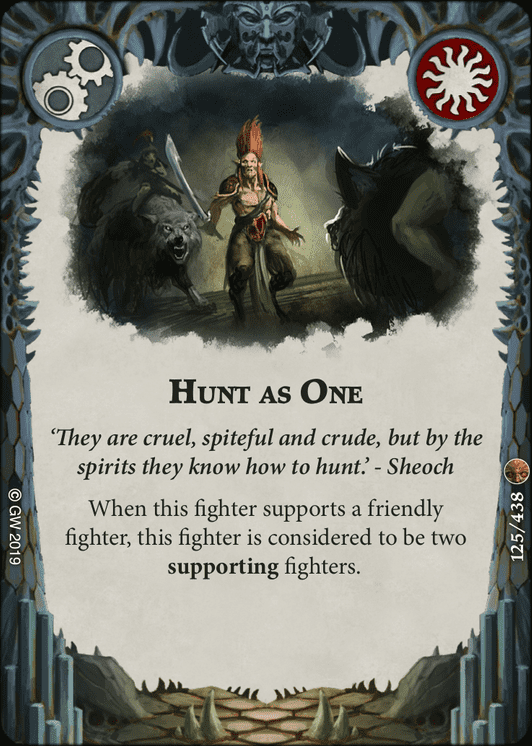
Savage Mauling is an amazing card to have when you know you’re about to make an attack with support, allowing you to ramp up your damage output. Bonded and Hunt as One can be great for getting even more of a bonus out of it.

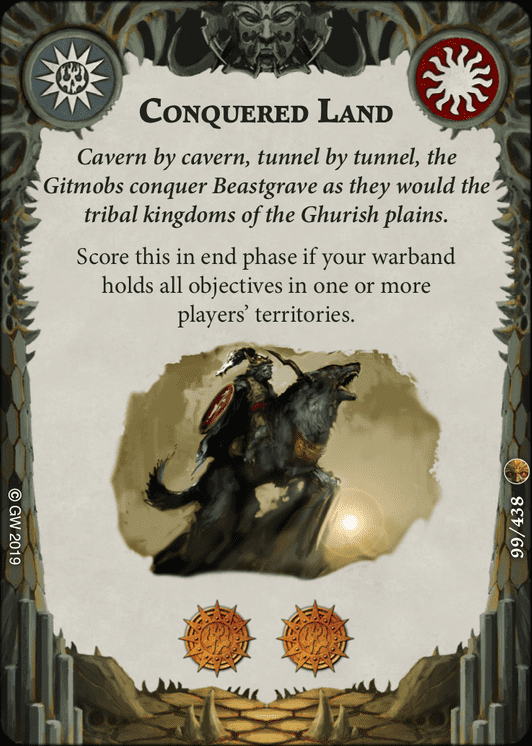
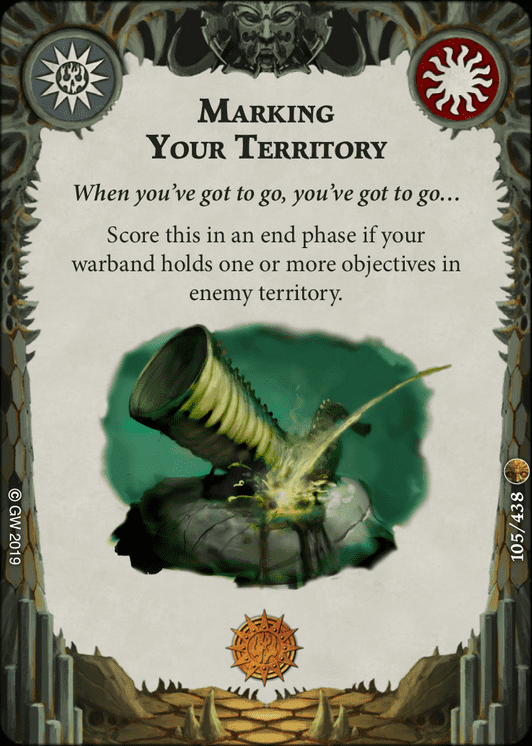
Conquered Land and Marking Your Territory
Something you might not have expected from such an aggro warband are the two objectives Conquered Land and Marking Your Territory which make sure you’re keeping an eye on objectives.
The good news is that since Gloom tokens were introduced, you might be able to score both of these objectives by just holding a single objective. The best part is that your opponent likely won’t see it coming.
With a little planning you can make this easier for yourself when setting up the boards. Any objective between the two boards in no-man’s land won’t count towards these objectives. This can work in your favour if an opponent spots you going for an objective and tries to hold one to counter you. It’s also useful to try and place as few objectives in your opponent’s territory as possible, so that even if your opponent is trying to get objectives it’s less work to take them back.
Difficulty comes from preventing your opponent predicting when you delve. As these objectives are both scored at an end phase, do not delve until last activation, to reduce your opponent’s chances to counter it. You want to convince them that you’re trying to be on the gloom token just for the support bonus.
I’d personally avoid having these cards in your starting hand if possible, because you want to focus your initial efforts on being aggressive as possible.

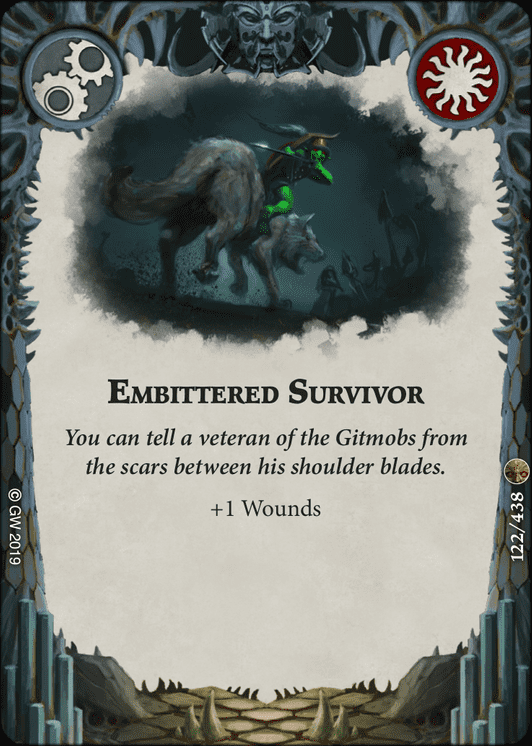
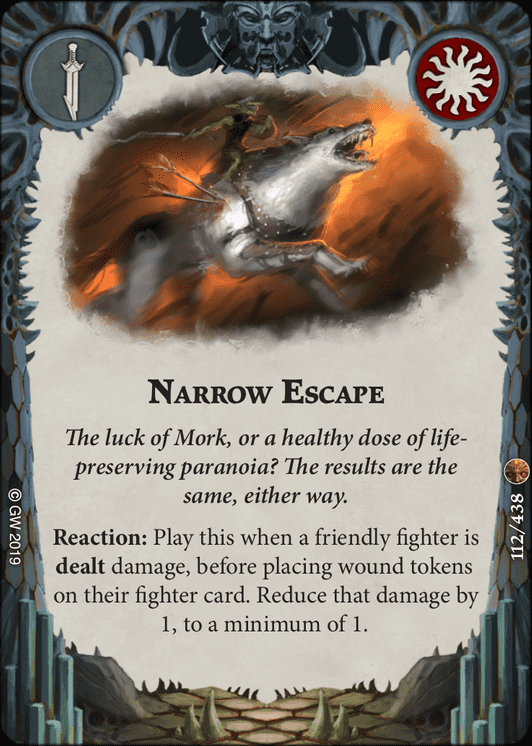
Leading the Charge, Embittered Survivor and Boss Hat
When playing with Rippa’s Snarlfangs there are two methods that people will usually try to use against you – Either by trying to kill Rippa before he gets upgrades, or by avoiding him completely and trying to kill Stabbit and Mean-eye before they inspire. Either way, Rippa’s Snarlfangs have options.
Whichever way you go, being aggressive with Rippa is going to be a key part of your strategy, so Leading the Charge is going to be an almost guaranteed card to score. As soon as you get hold of Embittered Survivor (essentially their faction version of Great Fortitude) you’re going to want to stick it on Rippa to keep him alive. There are also other cards such as Narrow escape which can help with this. Narrow Escape is also useful to have on-hand when being reckless with Rippa. Bait your opponent into thinking they can do more damage than they can.
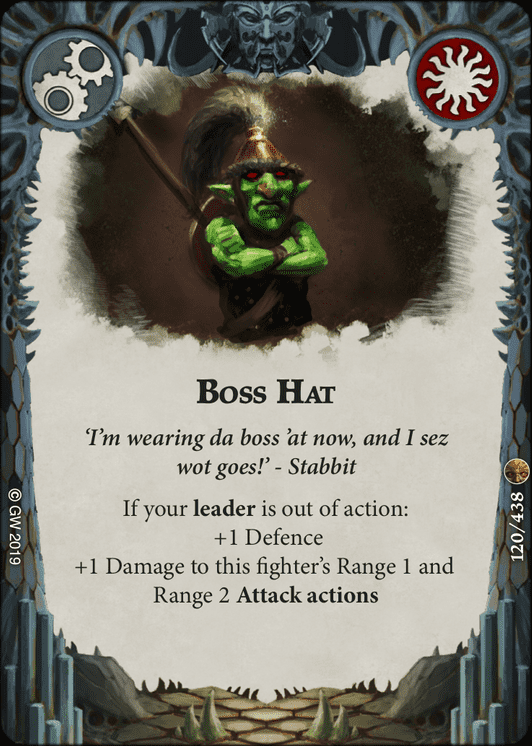
In rounds 2 and 3 you can get a little more reckless with Rippa. If your opponent does manage to take him out, there’s a backup plan.
If Rippa is out of action, then the rest of your warband will already be inspired, but you can make one of your fighters even more vicious with Boss Hat. As the damage upgrade is limited to range 1 & 2 attacks, this is naturally best suited to Stabbit. With a 2 damage scything attack and 3 defence, Stabbit can become even scarier than Rippa himself.

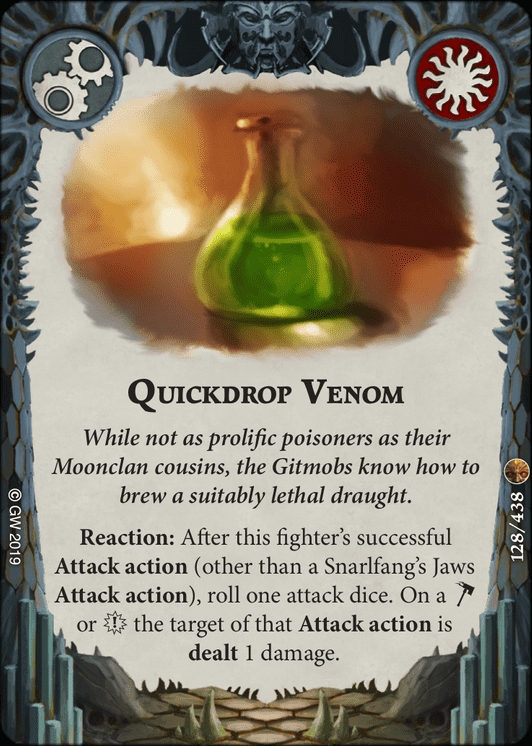
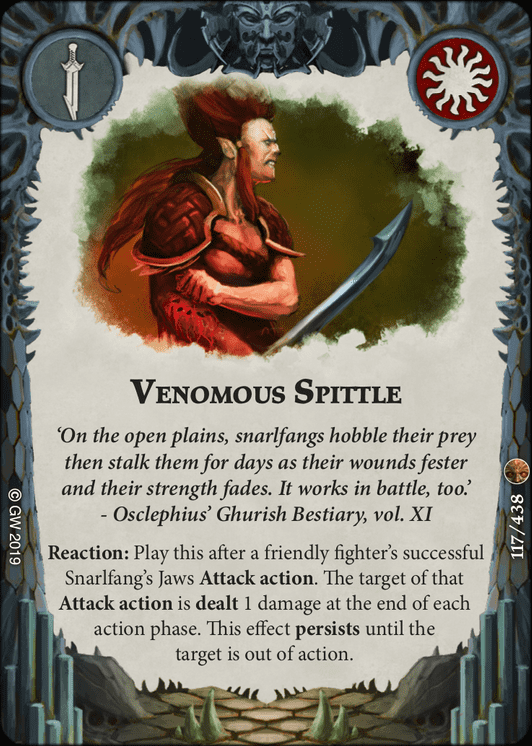
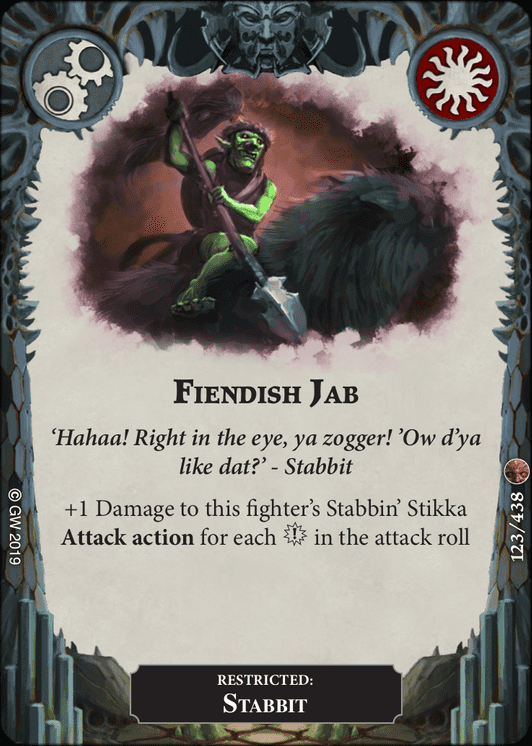
Quickdrop Venom, Venomous Spittle and Fiendish Jab
Playing with Rippa’s Snarlfangs is essentially about dealing as much damage as possible. In most cases your regular attack and Snarlfang’s Jaws reactions will be doing the job, but cards like Quickdrop Venom and Venomous Spittle are ideal for guaranteeing that extra damage. Quickdrop Venom is particularly good when you want to attack from range, or when you know your opponent has a good defence stat. It’s a straight 50/50 chance to deal an extra damage. Venomous Spittle is similarly great for guaranteeing death, albeit with a slight delay. It’s perfect for using on a fighter who has one wound remaining after your Snarlfang’s Jaws attack, so that you can focus on other targets with your remaining activations.
Fiendish Jab on the other hand is like giving Stabbit grievous on Steroids – you get +1 damage per crit. If you’re lucky enough to pair this with Vindictive attack for 2 extra dice and Boss Hat, then you suddenly have a fighter who has a chance to one-shot Mollog.
Follow the tips here and you might just be able to claw your way to victory.
How are your games using Rippa’s Snarlfangs going? Have these tips helped you find success? What advice would you give to someone struggling with Rippa and his fellow Snarlfang riders?
Did you enjoy this article? You could always tip the author with a coffee (or something stronger). If you want to try out a new warband, then check out Element Games. They have great deals on warbands and a wide range of Warhammer and accessories. Finally, make sure you’re following us on Instagram to stay up to date and get involved in our community!


Leave a Reply